How to Add and Edit Spa Services in SpaSphere
Create and manage the services you offer in SpaSphere, from names and descriptions to images and provider assignments.
8 min read
Your service menu is the foundation of your SpaSphere account. Every appointment, booking page, and checkout flow starts with a service. This guide walks you through creating, editing, and managing your services so your clients always see an accurate, professional menu. Visit SpaSphere to get started.
Why This Matters for Your Spa
Your service menu is the first thing potential clients evaluate when deciding whether to book. A well-structured menu with compelling descriptions and professional images can increase online booking conversion rates by 20-35%. Conversely, vague service names and missing descriptions create hesitation -- clients who are unsure what they are booking often abandon the process entirely. For a solo esthetician, each abandoned booking represents $100-200 in lost revenue. SpaSphere's AI-powered description generator and structured service builder help you create a polished, conversion-optimized menu in minutes rather than hours, so you can spend your time on clients instead of copywriting.
Key Capabilities
- Create services with a name, description, image, and color
- Generate service names and descriptions with Sophie, the built-in AI assistant
- Upload a custom image for each service with automatic cropping
- Write multi-paragraph descriptions with up to five sections
- List what is included with each service as bullet points
- Assign services to specific team members
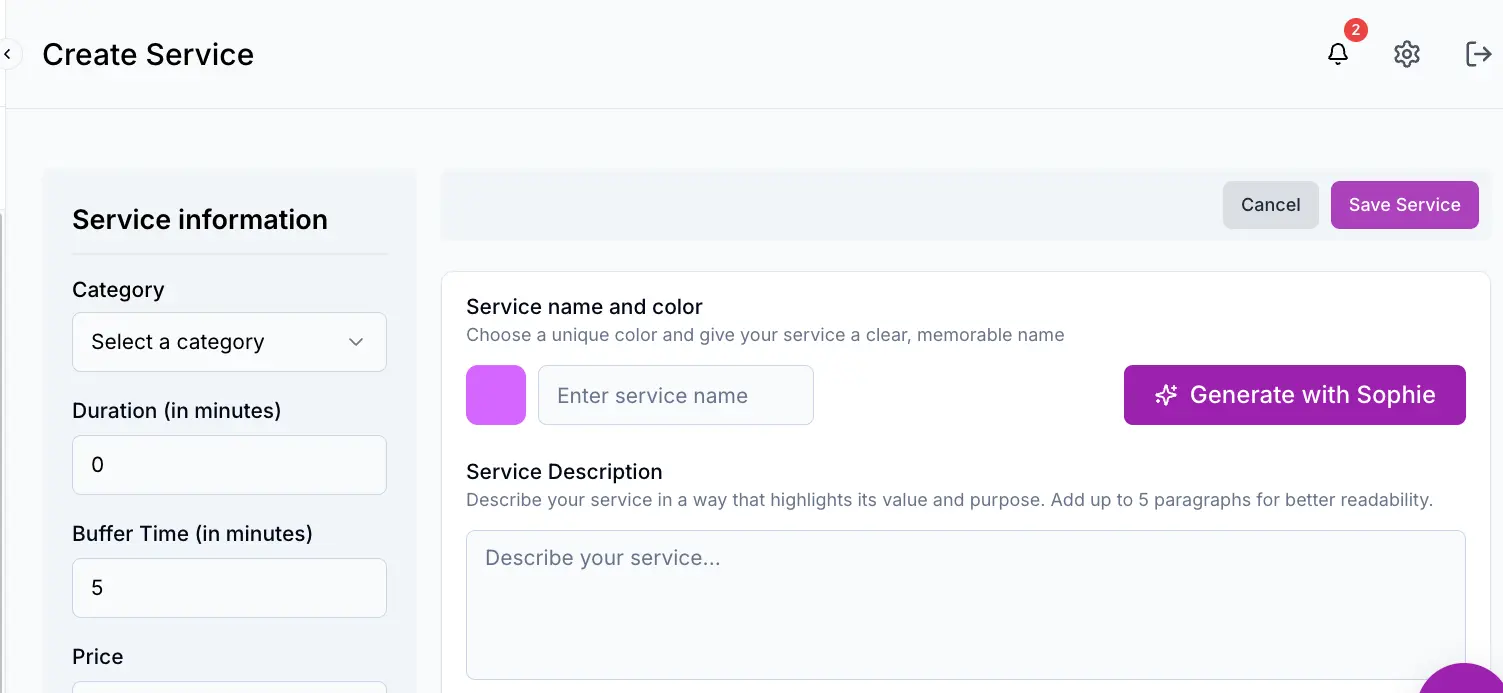
Creating a New Service
Navigate to the Services page
Click Services in the sidebar. You will see a table of all your existing services with their image, color, name, description, duration, buffer time, price, and category.

Click Add Service
Click the Add Service button in the top-right corner. This takes you to the Create Service page, which has a main content area and a settings sidebar.
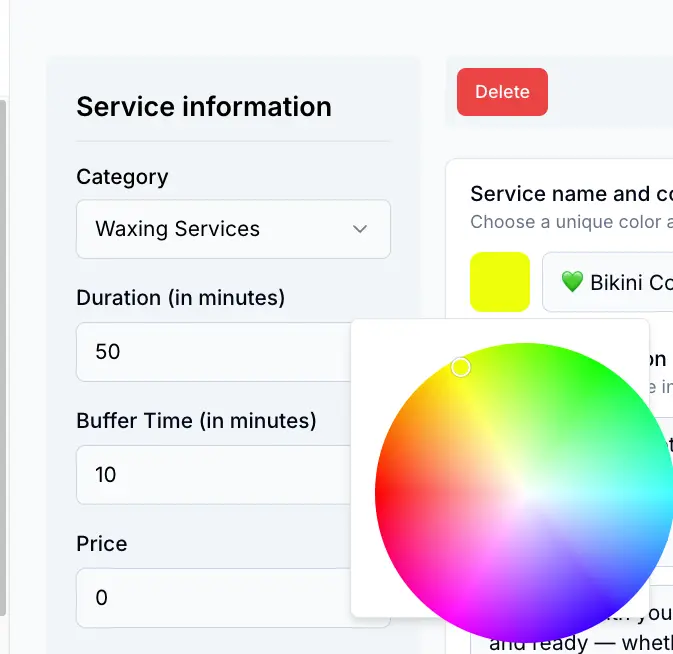
Enter the service name and color
Type your service name in the text field. Click the color swatch to the left of the name to open the color wheel and choose a unique color for this service. The color is used on the calendar and booking page to visually distinguish your services.
Write a service description
Add a detailed description that highlights the value of your service. You can add up to five paragraphs for better readability. Click Add Paragraph to create additional sections.
If you need help writing a compelling description, click Generate with Sophie to open the AI suggestions modal. Sophie generates professional service names and descriptions tailored to the spa industry.
Upload a service image
Click the upload area to add a service image. Recommended format is 4:3 ratio (e.g., 800x600 pixels). Accepted formats are PNG, JPEG, and WebP with a maximum file size of 5 MB. The image is cropped automatically to fit the 4:3 ratio.
Add what is included
Under the Whats Included section, list the individual items or steps your service provides. For example, a facial service might include "Deep cleansing", "Exfoliation", "Hydrating mask", and "LED light therapy". Click the plus button to add more items.
Configure settings and save
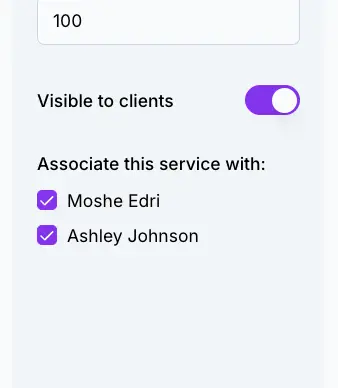
In the sidebar (or the Settings panel on mobile), configure the category, duration, buffer time, and price. Assign the service to one or more team members and toggle the Visible to clients switch. Click Save Service to publish the service to your menu.
Sophie AI saves hours on menu copywriting
The Generate with Sophie button uses AI to create professional, conversion-optimized service names and descriptions. This is especially useful when setting up your menu for the first time or when you want to refresh your copy. Spas that use detailed, benefit-focused descriptions see higher booking rates because clients understand exactly what they are paying for -- reducing pre-booking questions and no-shows from confused expectations.
Editing an Existing Service
To edit a service, click on its row in the services table. This opens the Edit Service page with all fields pre-filled. You can change any setting, update the image, add providers, or modify the description. Click Save Service when you are done.
Changes appear immediately across your booking experience
When you save edits to a service, the changes are reflected immediately on your booking page, calendar, and anywhere the service is referenced. Existing appointments that use this service are not affected by name or price changes. This means you can confidently update your menu -- refining descriptions, swapping images, or adjusting pricing -- without disrupting any appointments that are already on the books.
Assigning Services to Providers
Each service can be associated with one or more team members. This controls which services appear when booking an appointment for a specific provider.
Open the service settings
On the Create or Edit Service page, look for the Associate this service with section in the sidebar.
Select providers
Check the box next to each team member who performs this service. If you have only one provider, they are automatically selected and the checkbox is disabled.
Save the service
Click Save Service to confirm the provider assignments. When booking an appointment, the service dropdown will only show services associated with the selected provider.
Deleting a Service
To delete a service, open it for editing and click the Delete button in the toolbar. A confirmation dialog asks you to verify the deletion. Deleted services are removed from your menu and can no longer be selected for new appointments.
Deletion is permanent -- consider hiding instead
Deleting a service does not affect existing appointments that reference it. However, the service will no longer be available for new bookings or on your public booking page. If you might offer the service again in the future, consider toggling Visible to clients off instead of deleting. This keeps the service configuration intact for internal use while hiding it from your public menu.
Reordering Services
You can drag and drop services in the services table to change their display order. The order you set here is reflected on your public booking page and website.
Put your highest-value services first
Use the drag handle on the left side of each row to reorder your services. Your website will reflect the new order immediately. Placing your most popular or highest-margin services at the top of each category increases their visibility and can drive more bookings for the treatments that matter most to your revenue.
Frequently Asked Questions
Related Documentation
Ready to try this in your spa?
$1 for 30 days. No contracts. We migrate everything for you.